
How to Extract Images From a PDF Without Screenshots
Share this article
A picture looks sharp inside a PDF, but the screenshot you save looks soft when you put it in a presentation. The screenshot captured the picture at its displayed size, not necessarily at the pixel dimensions stored inside the document. Zooming the PDF changes the view; it doesn’t tell you which image data you’re saving.
For a separate photo or bitmap logo, start with Extract Images From PDF. For a complete page containing text, pictures, and charts, use a page converter instead. This guide explains that distinction, the settings that hide apparently missing images, and how to check the files you actually downloaded.
Why extraction and page conversion give different results
A PDF page describes where to draw text, shapes, and image objects. A photograph may exist as a raster image with its own width and height, while the caption beneath it is a separate text instruction. A vector logo may contain no raster image at all, even though it looks like a picture on the page.
An image extractor looks for supported image objects. A page converter renders the assembled page, including text and graphics, into a new bitmap. Neither is universally better: extraction suits reusable pictures, while page rendering suits a faithful view of the whole sheet.
| What you need | Start here | What the output contains |
|---|---|---|
| One photograph without its caption | Extract Images | A decoded embedded raster image |
| The full page, including text | PDF to PNG or PDF to JPG | A rendered picture of the page |
| A vector chart as editable paths | The original design file or a suitable vector editor | A format that retains paths, if available |
| A complete scanned sheet | Include full-page scans, or convert the page | The scan image or assembled page rendering |
There’s another distinction behind claims about “original quality.” LocalPDFLab decodes supported image data and encodes a new PNG, JPG, or WebP. It can retain the supported image’s decoded dimensions, but it doesn’t promise the original compressed bytes, camera metadata, or original color profile.
That matters when someone needs an archival original rather than a usable picture. Ask for the source photograph if its exact encoding, provenance, or metadata matters. A visually good export isn’t proof that you recovered the original camera file.
1. Identify the picture and choose the right output
Open the PDF and decide whether you need the embedded picture or everything visible around it. If the caption, border, callout arrows, or surrounding text must travel with it, a page conversion is usually the more predictable choice. You can then crop the rendered image in an image editor.
For extraction, open the tool and choose a PDF using Drop a PDF here, or click to choose one. Wait for the source-page previews, then use Pages under Extraction settings to narrow the work. Enter a range such as 2-4, 8, or leave it blank to scan the whole document.
Those numbers refer to physical PDF page positions, not printed labels. A report with an unnumbered cover may print “1” on its second PDF page. Use the source thumbnails to check the range rather than copying a printed page number without looking.
Start with PNG when you need clear edges, diagrams, or supported transparency. Choose JPG for photographs when smaller output is more useful than preserving every decoded pixel. WebP is another option, but confirm that the application receiving the image accepts it before processing a large batch.
| Format | Useful starting point | Check before sharing |
|---|---|---|
| PNG | Diagrams, logos, further editing | File size can be larger for photos |
| JPG | Photos for common office applications | Lossy encoding and a solid transparency background |
| WebP | Images for compatible websites and applications | Recipient support and visible encoding artifacts |
Changing to PNG won’t restore detail already lost when the PDF was created. If a small photograph was enlarged inside the source document, extraction recovers the available pixels, not a higher-resolution version that no longer exists there.
2. Extract a small sample before processing every page
Set Image filtering to Show every embedded image for your first diagnostic run. Leave Keep every occurrence off unless you need a separate output for each repeated placement. Click Extract images, then wait for the results message before deciding anything is missing.
The default filtering option hides tiny images and thin strips. That keeps a normal gallery useful, but a small icon or narrow graphic may be exactly what you need. Starting with every supported image gives you a clearer picture of what the document actually contains.
Select a source page to narrow the gallery and open an image preview to inspect it. Compare the candidate with the picture on the original page. A PDF can contain alternate graphics, repeated objects, or small pieces that make sense only when the page renderer places them together.
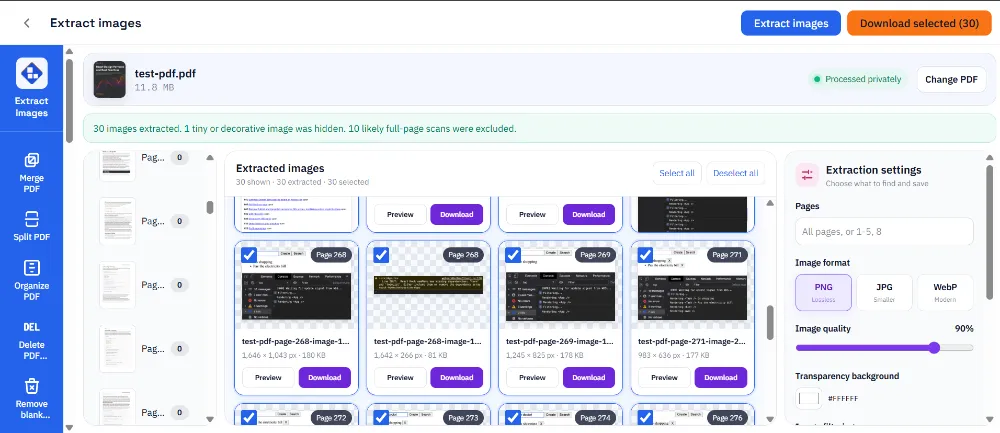
Reused images are grouped by the tool’s encoded output rather than by their visible page position. A repeated logo can therefore appear as one gallery item with multiple occurrences. Turn on Keep every occurrence and extract again if your next step depends on a separate file for each placement.
Don’t assume a smaller gallery means that pages were skipped. Compare the page count, selected range, filtering settings, and reuse information together. A twenty-page report containing the same bitmap logo on every page may have far fewer unique images than pages.
3. Recover missing scans and choose a fallback for graphics
If the desired picture is still absent, enable Include full-page scans and extract again. The tool uses image dimensions and page shape to identify likely scans, so a normal photograph with a similar aspect ratio can sometimes be excluded too. This option is worth checking even when the PDF wasn’t produced by a scanner.
An image-only PDF may store a complete sheet as one image, but some files split the page into pieces. Others use masks, clipping, or drawing instructions that aren’t exposed as one supported picture. Seeing fragments doesn’t mean that changing the filename or repeating the same extraction will join them.
Use PDF to PNG when you need the assembled appearance, especially for pages containing text or line art. Use PDF to JPG when the output is mainly photographic and file size matters. Both approaches render pages, so expect a different result from extracting an individual object.
If only one region matters, you can first crop a copy of the PDF and then render it. Cropping changes the visible page area; it isn’t a method for permanently removing confidential content. Keep that workflow separate from redaction and preserve the original source document.
For large documents, narrow Pages to a few sheets and retry. Decoding an image takes working memory beyond the compressed PDF’s file size, and the gallery also needs previews and output data. A small PDF can still contain an image that expands substantially when decoded.
If the tool reports skipped objects, verify the pages you needed rather than treating the remaining gallery as a complete inventory. An unsupported or oversized object may need a desktop workflow or the original source image. Don’t repeatedly reload the tab expecting a supported decoder to appear.
4. Download, inspect, and verify the result
Select the pictures you want and click Download selected. A single selected image downloads directly; multiple selected images are packaged as a ZIP. Open the ZIP and inspect its contents before moving it into a project folder or sending it to someone else.
Check the saved image’s dimensions in your image viewer or file properties. A screenshot taken from a narrow window may be much smaller than the extracted picture, but bigger dimensions alone aren’t a quality guarantee. Inspect sharp edges and fine details at 100% view, where one image pixel maps to one display pixel.
JPG output can’t retain transparent pixels, so review Transparency background before extraction. A logo that looks correct on a white slide can show an unwanted rectangle on a colored slide. If supported transparency matters, try PNG and check the saved file against both a light and a dark background.
On Chrome for Windows, Ctrl+J opens Downloads. Check whether the download completed and use its folder action to locate the actual destination. If File Explorer hasn’t updated its view, refresh the folder before concluding that extraction failed; a stale folder view and an incomplete download are different problems.
Our synthetic browser check completed two consecutive ZIP downloads and read both outputs from disk. That checks the download path in the test setup, not every browser or the behavior of Windows Explorer on your computer. Your final verification should always include opening the downloaded file.
What not to do when the output looks wrong
Don’t rename a PDF to .zip and expect ordinary image files to appear. A PDF is not a ZIP container with a different extension. Use an extractor that understands its structure or obtain the original assets from the document creator.
Don’t keep raising JPG quality to repair a blurry source. The quality setting controls a new encoding step; it can’t recreate detail that wasn’t embedded. Likewise, converting a heavily compressed picture to PNG avoids another lossy JPG encoding but doesn’t reverse previous compression damage.
Don’t assume extraction reproduces every crop, rotation, blend, and clipping effect visible on the PDF page. The stored image and its placement instructions are different parts of the document. If the exact assembled appearance matters more than the individual object, render the page and inspect that output.
For comparison, Smallpdf’s extraction guide distinguishes converting whole pages from extracting individual images. Those are useful categories when choosing any service, but its account conditions and processing path are separate from LocalPDFLab’s. Check the current product instructions before relying on a particular option.
For sensitive material, follow your organization’s handling rules and read the browser PDF security guide before opening a file. Also remember that recovering an image doesn’t grant permission to reuse it; check the source’s license or the owner’s permission when that isn’t already clear.
How to know it worked
You have the right result when the downloaded image opens, contains the intended picture, and has dimensions and transparency suitable for its destination. Verify one representative image at 100% before exporting the remaining pages with the same settings.
Frequently asked questions
Does extracting images preserve their original quality?
LocalPDFLab decodes supported embedded images and saves new PNG, JPG, or WebP files. It can retain their decoded pixel dimensions, but it does not promise the original compressed bytes, camera metadata, or color profile. PNG avoids an additional lossy JPG encoding step.
Why are some pictures missing from the extracted results?
Choose Show every embedded image, enable Include full-page scans, and extract again. Filters can hide small images or pictures shaped like a page. Vector artwork and unsupported image objects may still be absent; use PDF to PNG if you need the assembled page appearance.
How do I extract every copy of a repeated logo?
Enable Keep every occurrence before extracting. Otherwise, reused images with matching encoded output are grouped into one gallery item. Check the selected page range as well if you need occurrences from the whole document.
Should I extract images or convert the PDF to JPG?
Extract images when you want individual embedded pictures without surrounding page text. Convert the PDF to JPG or PNG when you need complete pages, including captions, charts, and layout. Extraction may not reproduce the clipping or placement effects visible on the page.
Why does Download selected save a ZIP file?
One selected image downloads directly. Multiple selected images are packaged as a ZIP so you can download them together. Open the ZIP and check the pictures before sharing or importing them into another application.