
How to Create a Fillable PDF From an Existing Document

Share this article
Your PDF has a line labeled “Email,” but clicking it doesn’t let anyone type. The line is only page artwork. To make it fillable, you need an interactive field positioned over that answer area, then a saved PDF that retains the field.
You can do that with Create Fillable PDF using an existing document or a scan. The workflow below focuses on a reusable registration form, including US Letter page preparation, field naming, test answers, and the checks that catch a form which looks right but doesn’t work after download.
Why a blank line isn’t an interactive form field
An ordinary PDF can contain text, images, and shapes without containing any form controls. A visible rectangle doesn’t tell the viewer what answer belongs there or where to save it. Interactive fields add that separate structure: a field has a type, a name, a value, and a visible widget on the page.
The distinction also explains why placing ordinary text over a blank line doesn’t create a reusable form. That can complete a one-time document, but the next recipient won’t receive a text-entry control in that location. Use Add Text to PDF for visible annotations and the form builder for interactive inputs.
| Your document task | Appropriate tool | Expected output |
|---|---|---|
| Add answer areas for other people | Create Fillable PDF | A PDF with interactive fields |
| Complete fields that already exist | PDF Form Filler | A copy containing your answers |
| Add a note to a static document | Add Text to PDF | Visible page content |
| Design the page before adding fields | Create PDF | A regular PDF to use as the background |
The page doesn’t need selectable text before you add fields. A readable scan can remain as the background while you place controls over its answer areas. That makes the answer areas interactive; it doesn’t convert the scanned instructions into editable text or correct a crooked scan.
Adobe’s form-creation tutorial describes the same broad task of adding fields to an existing document or scan. The steps below use LocalPDFLab’s controls, so don’t look for an Acrobat command named “Prepare a form” inside this editor.
1. Prepare the page and decide what recipients should enter
Start with a clean copy containing no completed answers. For a simple event registration form, include visible labels for name, email, attendance choice, and any optional notes. Put instructions on the page itself so they remain understandable when someone prints it or opens it in a different viewer.
If your recipients print on US Letter paper, prepare the source at 8.5 by 11 inches before placing fields. The builder’s Start with a blank A4 page option creates A4, not Letter. Use Create PDF to prepare a Letter document, or export the correct paper size from the application where you designed the form.
Open the builder and select Choose a PDF to make fillable. Confirm that the first page preview is the expected document and review any additional pages in the page sidebar. Adding fields to the wrong version can waste more time than checking the source filename now.
Use field types according to the answer you need. A checkbox suits an independent yes-or-no response, while a radio group suits one choice from a related set. A dropdown is useful when recipients should choose from a short, fixed list rather than invent their own spelling.
| Answer | Field type | Example name |
|---|---|---|
| A person’s typed name | Text | attendee_name |
| An optional mailing-list preference | Checkbox | email_updates |
| Exactly one session choice | Radio group | session_choice |
| A fixed attendance category | Dropdown | attendance_type |
Avoid collecting information simply because another form includes it. A registration sheet that only needs an email address doesn’t automatically need a home address too. Keep the form focused on the task and use synthetic answers while testing it.
2. Place fields and give each answer a clear identity
Choose a type from Add field, then position the new control over its answer area. Resize it to cover enough space for a realistic response without covering the printed label. Use Fit width or the zoom controls when small alignment errors are hard to see.
Give each independent answer a unique field name. Names such as contact_email and attendee_name are easier to review than a collection of generic numbered boxes. A visible page label helps the recipient; the field name helps identify the underlying answer and prevents confusion when editing the template later.
For a dropdown or radio group, inspect the available options before testing. Use concise choices that describe what they mean without requiring someone to guess. If you’re duplicating a control as a starting point, check its new name, position, and options rather than assuming duplication produced the finished field.
The builder creates an independent name when you duplicate an editable field. That is useful for separate answers, but it isn’t a method for linking two locations to one synchronized value. Test each duplicated control individually so the same default or description doesn’t accidentally describe different questions.
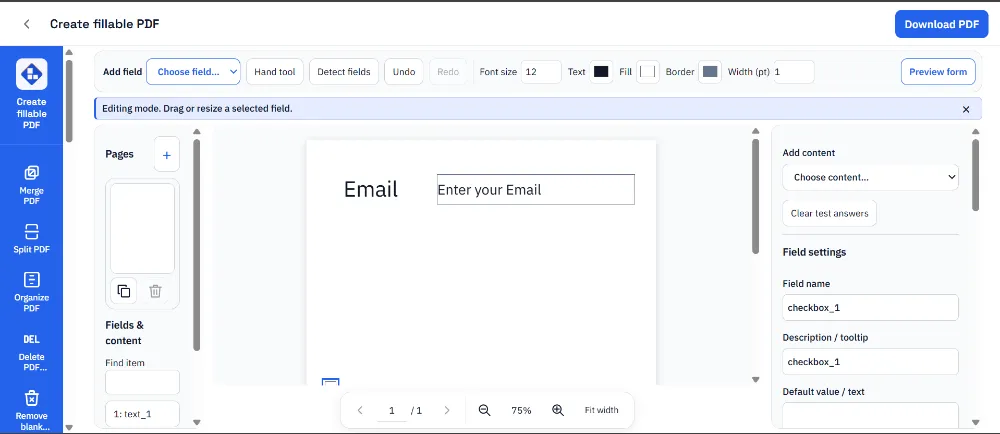
Use Detect fields if the source has clear answer lines and boxes. It suggests areas on the current page for review; it doesn’t understand your questions or automatically design a finished form. Accept useful suggestions and skip decorative lines, then choose the correct types and settings yourself.
Check imported fields before adding a second layer
If the source already contains interactive controls, inspect them before placing new ones over the same area. Two overlapping fields can make clicking, typing, and reading the result confusing. Open Preview form to see which existing controls already work and which areas genuinely need a new field.
Detection doesn’t use OCR to read labels or infer radio-group relationships. A box around a section heading may look like a candidate, while a faint answer line may be missed. Treat the suggestions as a placement aid and compare every accepted field with the original page.
Some imported fields can be converted for editing, while more complex structures remain protected from conversion. Don’t assume every field can be rebuilt without changing behavior. If the editor doesn’t offer a supported path for an existing control, keep the original and use a tool designed for that form structure.
For long answer areas, test whether the configured field provides enough room for the response. A short default name isn’t a good substitute for trying a realistic longer name or address. Adjust the field size and text settings based on what is visible in the exported file, not just the editor preview.
The same caution applies to instructions. A field description can help explain the expected value, but essential directions should also appear on the page. Recipients may print the form or use a viewer that presents descriptions differently from your browser.
3. Test the form as a recipient would use it
Click Preview form, then type synthetic answers and operate every checkbox, radio group, and dropdown. Test both selected and unselected states. A control that looks centered while empty may have clipped text or an awkward appearance once it contains a longer value.
Try moving through the answers with Tab, and use Shift+Tab to go backward. The exported form uses row-based tab ordering, but the recipient’s viewer determines how navigation actually feels. Review the downloaded file in the viewer your recipients are likely to use instead of relying only on the browser editor.
Preview answers are temporary and don’t automatically become template defaults. Set an intentional default in Field settings if the blank template should start with a particular value. Use Clear test answers to reset the preview, then check the default settings separately for any example values you shouldn’t distribute.
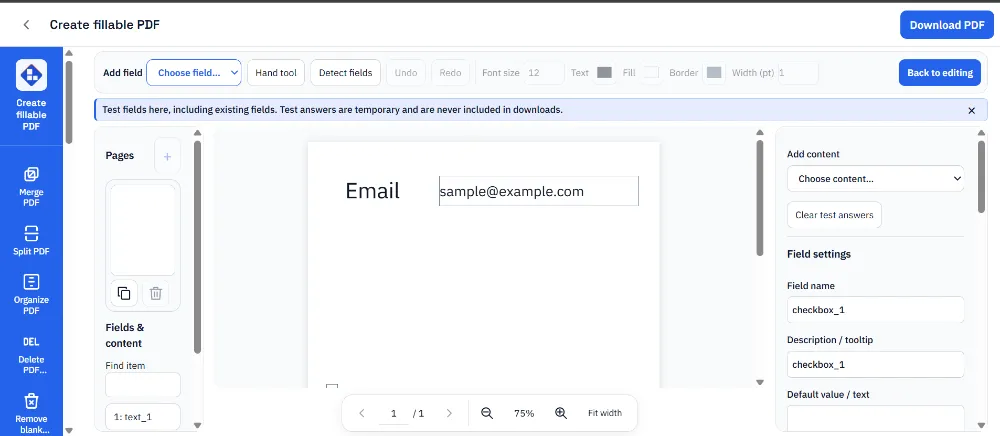
Don’t assume a Required setting prevents every recipient from saving an incomplete PDF. Viewers differ in enforcement, and saving a document isn’t the same as submitting a web form. Include visible instructions and check completeness through your actual collection process.
Field descriptions and sensible navigation help, but they don’t certify the whole document’s accessibility. Source reading order, document tagging, contrast, and viewer behavior still matter. If your organization has an accessibility requirement, use its document review process before distributing the form.
4. Download the interactive template and reopen it
Use Download PDF for the version recipients need to fill in. Keep flattening off for an interactive template. Flattening turns the form’s visible appearances into page content and removes interactive fields, so it solves a different problem from creating a blank reusable form.
Save the template under a clear filename such as registration-template.pdf. Keep completed copies separate, for example registration-test-completed.pdf during your own checks. Clear naming makes it less likely that someone sends the blank source back or distributes a test response as the next template.
Open the downloaded template in PDF Form Filler or your intended recipient viewer. Enter a fresh synthetic answer, save a completed copy, close it, and reopen that saved copy. This catches failures that a screenshot of the editor cannot reveal.
Check that the values persist and that the source page still looks correct. Review the first and last page, longer answers, and any imported controls you retained. If the file contains multiple choice groups, test that selecting one answer doesn’t change an unrelated question.
Optional local drafts are useful while authoring, but they aren’t an encrypted vault or a cloud backup. Save draft locally stores the source and field settings in that browser. Use Delete draft when appropriate on a shared device, and keep the downloaded template in your normal managed storage.
Our export checks reopened synthetic forms and verified field types, settings, and flattening behavior. The browser checks exercised the editor’s five field types, preview, duplication, undo, and export. Those checks support this workflow, but they don’t establish compatibility with every viewer or every imported form.
What not to do when a form stops being fillable
Don’t print the template to another PDF as your normal save method. Depending on the viewer and print path, the result may retain only the printed appearance. Use the application’s PDF download or save function when you need to preserve interactive controls.
Don’t mistake a signature image for a certificate-based digital signature. A drawn or uploaded signature image is visible artwork, and this builder isn’t a certificate-signing workflow. Use the signature process required by the organization receiving the document rather than assuming the two are interchangeable.
Don’t rebuild a specialized XFA form here and expect its scripts, calculations, or submission process to survive. This workflow is for supported standard PDF forms. Preserve the source and use the issuing organization’s instructions for a form with specialized behavior.
For confidential templates or collected answers, review the browser PDF security checks. If you need to review two template revisions, use the PDF comparison guide for visible and text changes, while separately checking the actual fields and defaults.
How to know it worked
The template is ready when a recipient can enter a fresh answer, save a copy, and reopen that copy with the correct value and layout intact. Run that check in the intended viewer before sharing the blank form broadly.
Frequently asked questions
Can I make a scanned PDF fillable without OCR?
Yes. Open a readable scan and place interactive fields over its answer areas. The scan stays as the page background. This does not turn its printed instructions into editable text or repair blurred or crooked pages.
Which field types can I add to the form?
The builder supports text fields, checkboxes, radio groups, dropdowns, and list boxes. Use unique names for independent answers, and test the choices and defaults before downloading the template.
Will my preview answers appear in the downloaded template?
Preview answers are temporary and do not automatically become template defaults. Set intended defaults in Field settings. Before sharing, clear the test answers and inspect the default settings for any sample or personal information.
Why is my downloaded PDF no longer fillable?
Check whether you flattened the form or printed it to a new PDF. Flattening removes interactive fields, and printing can retain only their visible appearance. Download the interactive version, then enter an answer, save a copy, and reopen it in the intended viewer.
How do I create a US Letter form instead of A4?
Start with a PDF prepared at 8.5 by 11 inches, or create a Letter document in Create PDF and open that download in the form builder. The Start with a blank A4 page button creates A4, not US Letter.